Prostation Settings
Workstation Settings
This section allows you to configure and manage your virtual workstation on Spark Cloud Studio. It offers various tools to optimize your setup, control usage, and automate operations.
Go to the Workstation section under the Tools category in the left sidebar.

In the list of available workstations, locate the one you wish to configure or change settings. Click on the Settings option on the right side of the card.
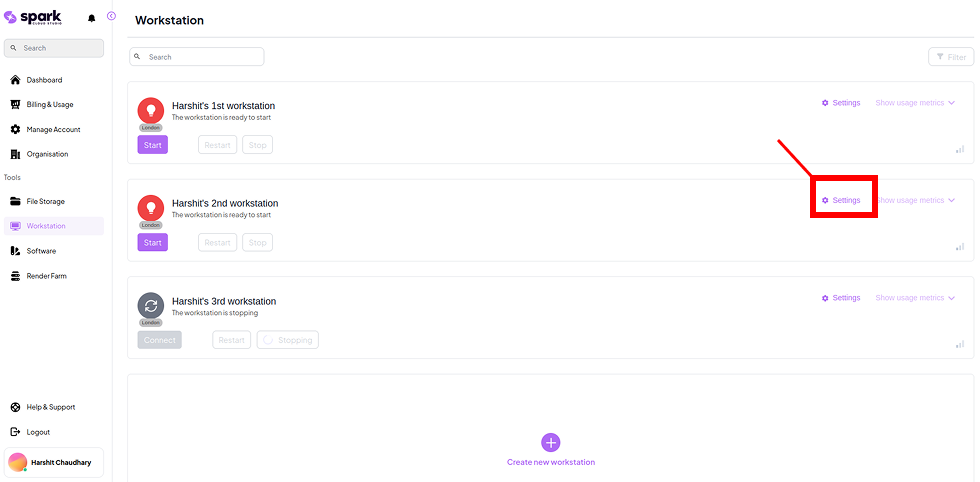
You will be taken to a detailed Workstation Settings page containing various configuration options and automation tools.
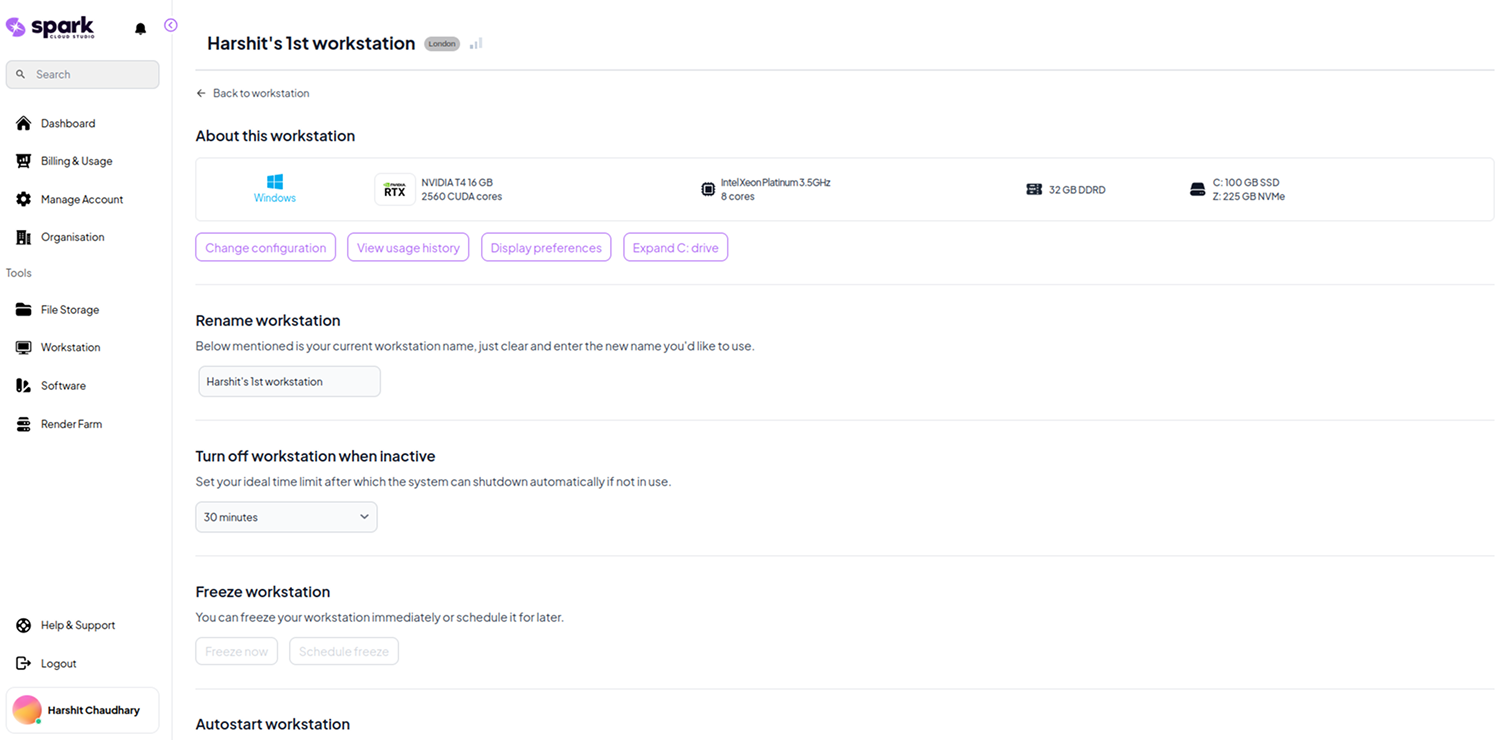
Settings Options
| Feature | Description | Status | Image |
|---|---|---|---|
| Change Configuration | Modify GPU, CPU, RAM, and storage specs of your workstation. | At Startup |  |
| View Usage History | View session logs, usage duration, cost breakdowns, and activity audits. | Running | 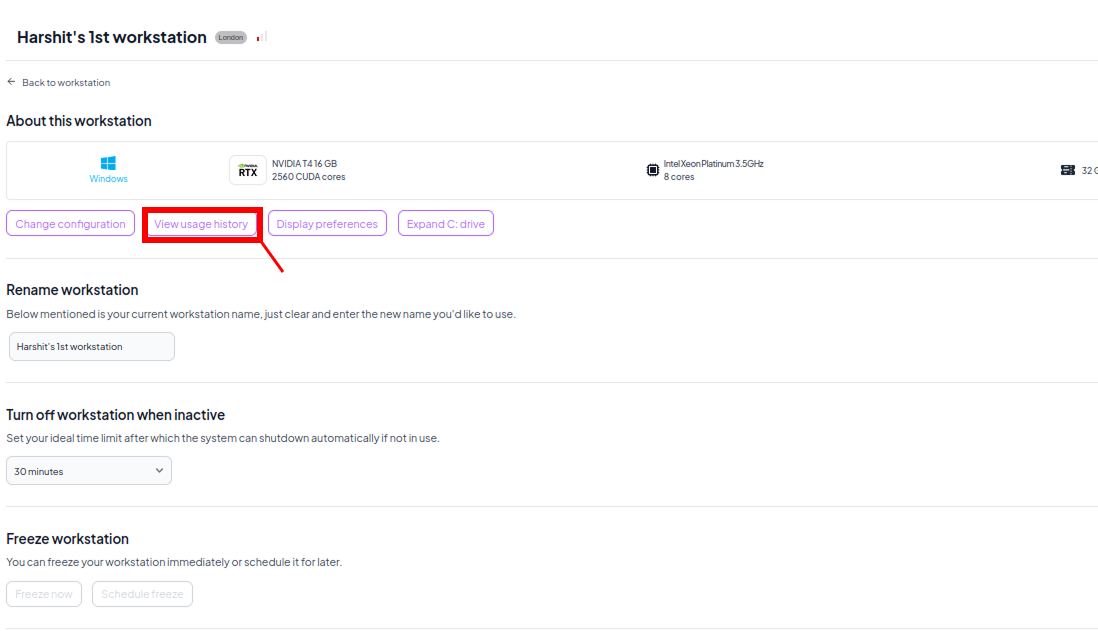 |
| Display Preferences | Customize monitor settings, screen resolution, and remote view preferences. | Running | 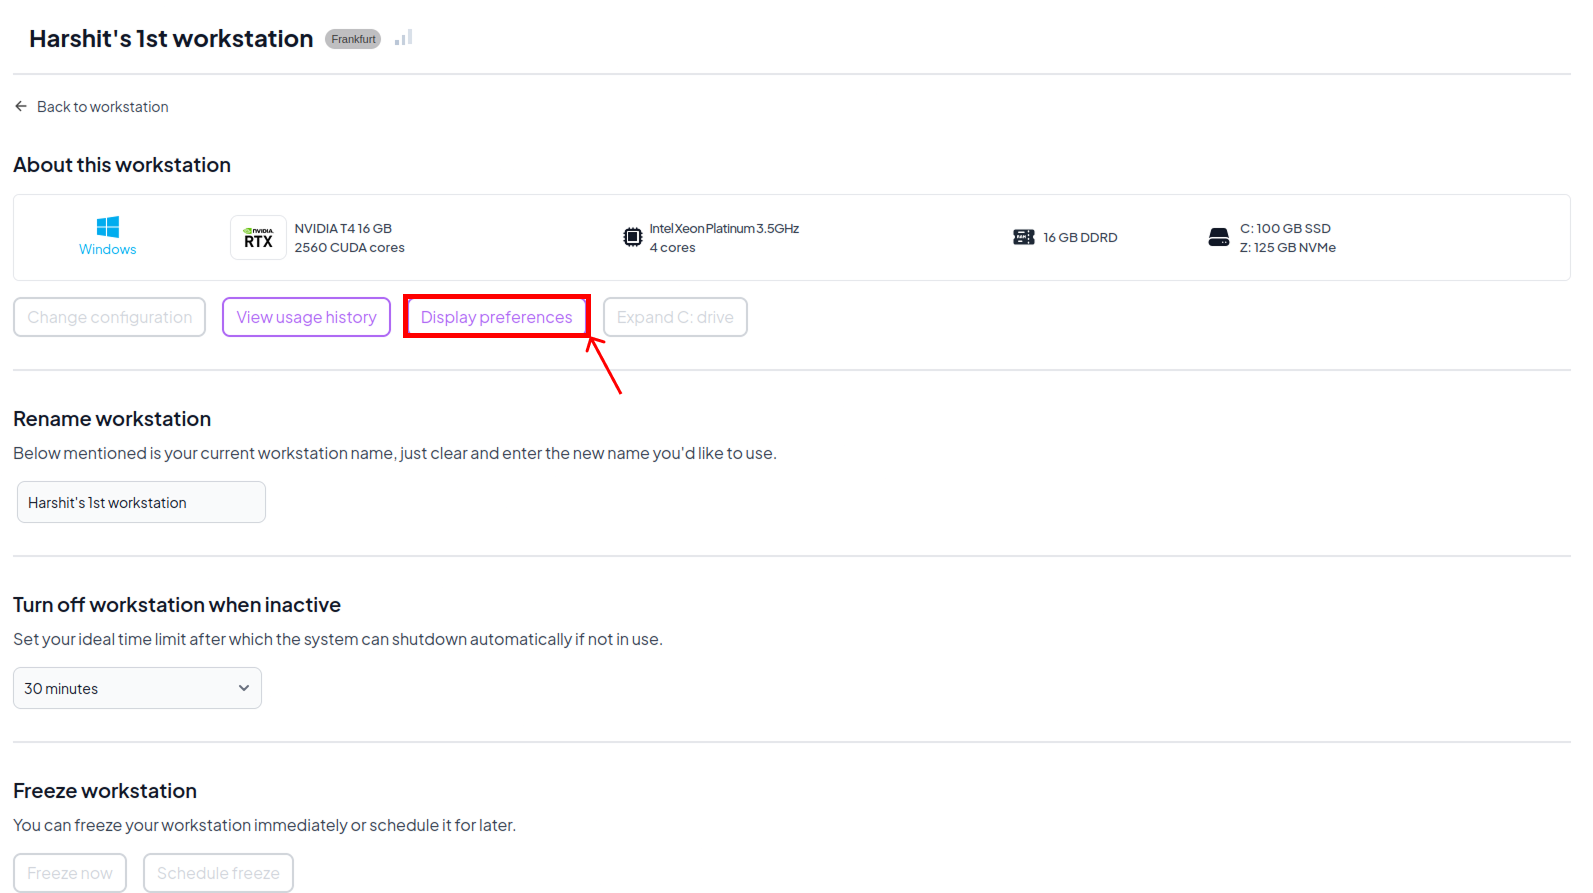 |
| Expand Root Drive | Increase space on the primary system disk (C:) to avoid performance issues. | Running | 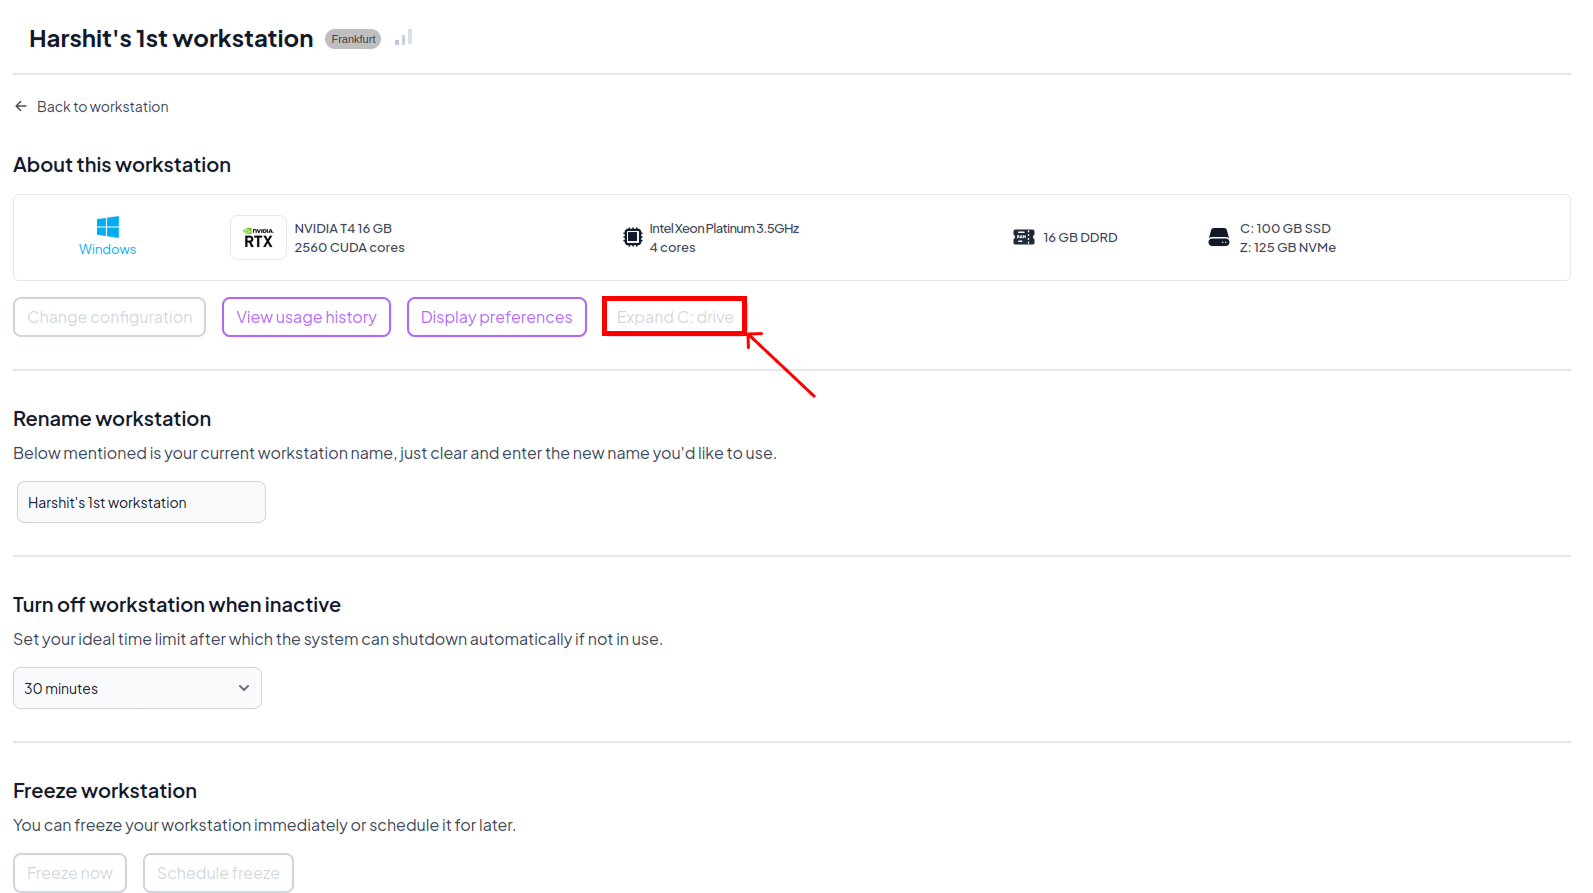 |
| Duplicate Workstation | Create an exact replica of your workstation's hardware configuration. | Running | 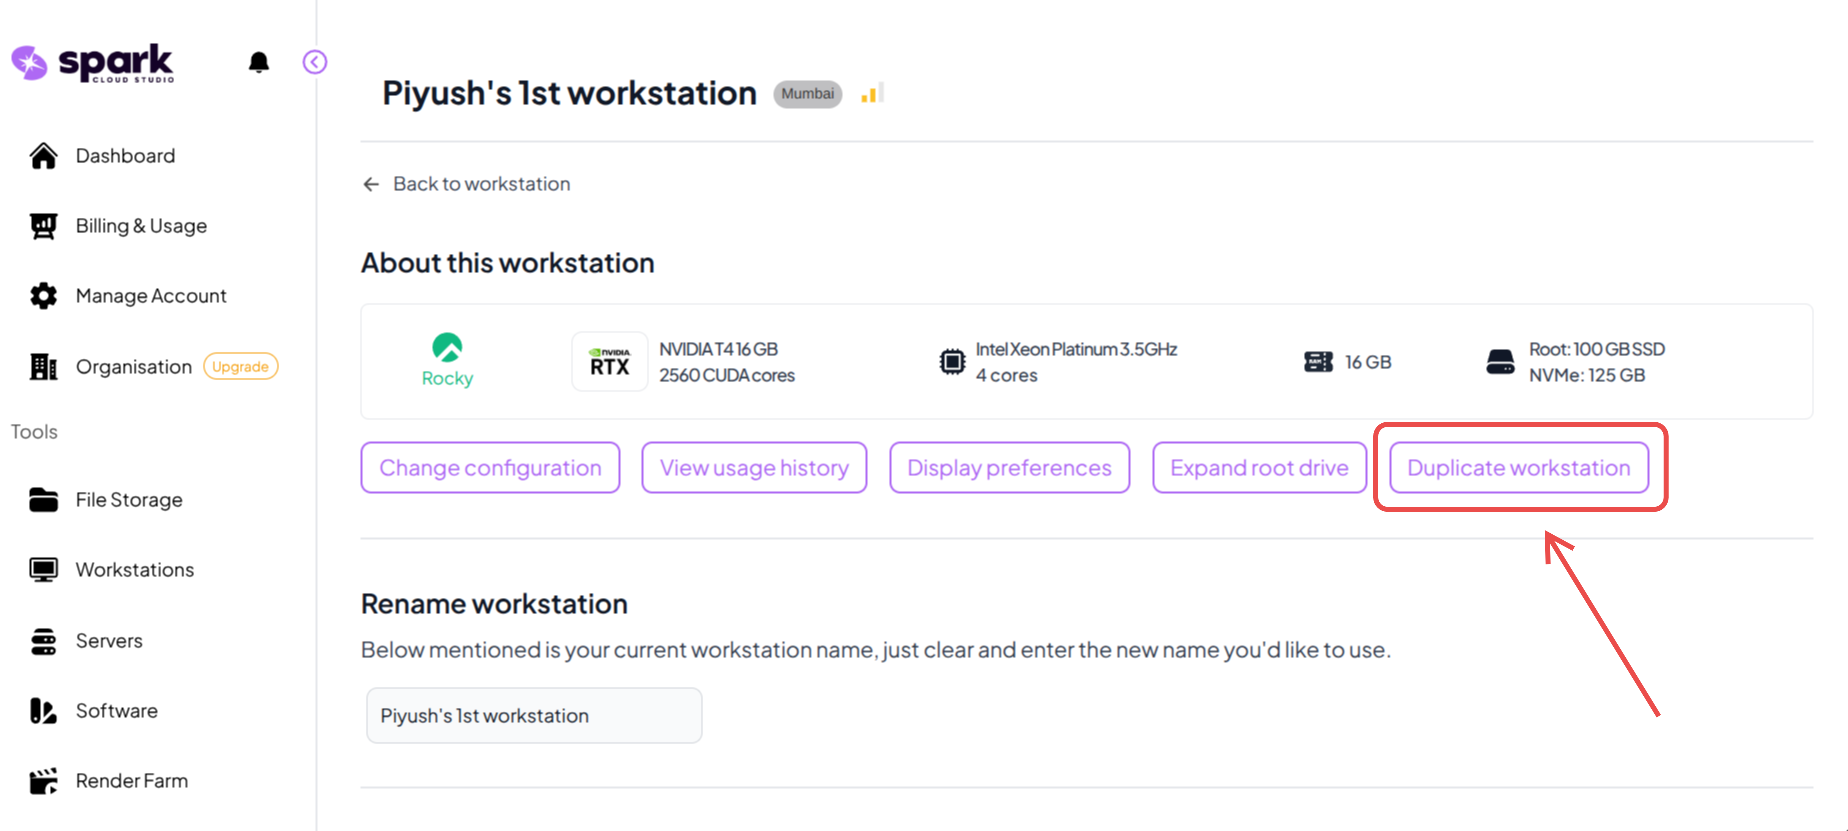 |
| Rename | Allows you to assign a custom name to your workstation for better organization. | At Startup | 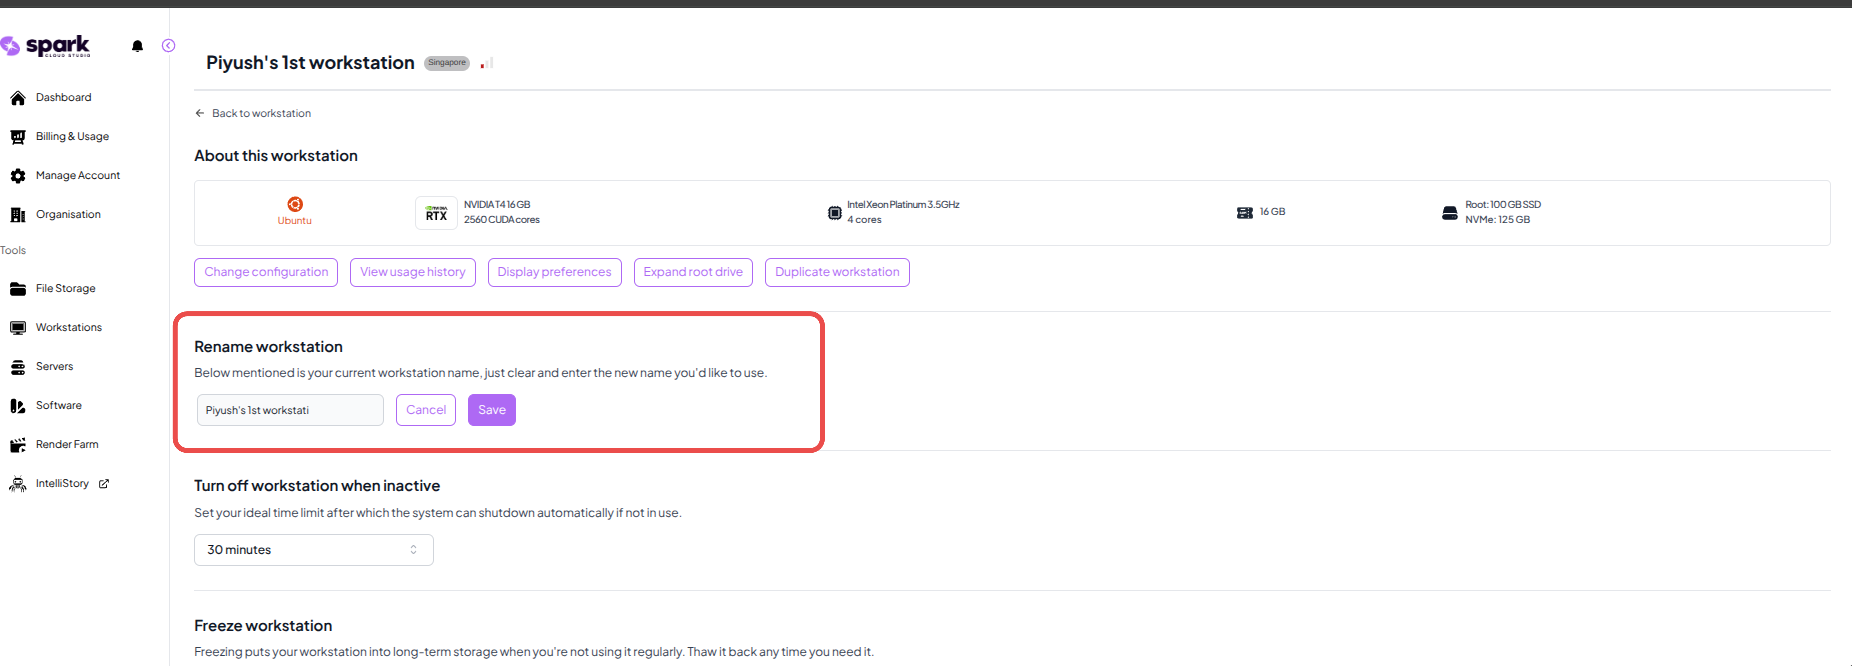 |
| Turn Off When Inactive | Automatically shut down the machine after a period of inactivity to save costs. | Running |  |
| Freeze Workstation | Freeze Workstation is used to save the workstation for long-term use when it is not needed regularly. The workstation stays preserved and can be accessed again later without keeping it actively running. | At Stop | 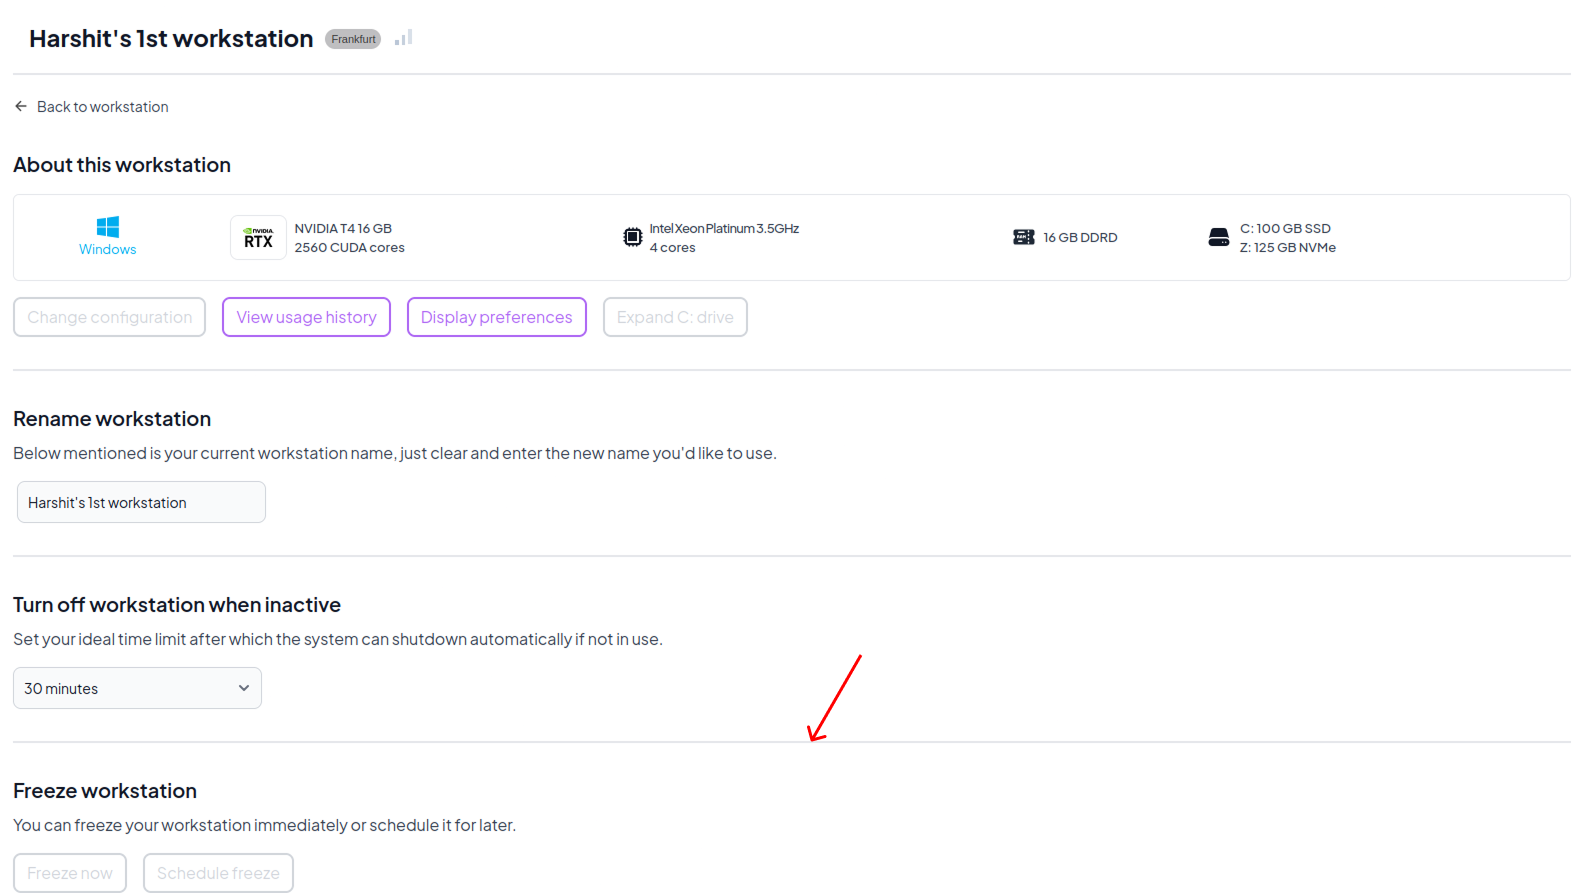 |
| Thaw Workstation | Thaw Workstation restores a previously frozen workstation back to an active state while preserving its existing configuration and data. Once thawed, the workstation becomes available for normal access and usage again. | At Freeze | |
| Delete Workstation | Permanently deletes the workstation and all its associated resources. | At Startup | 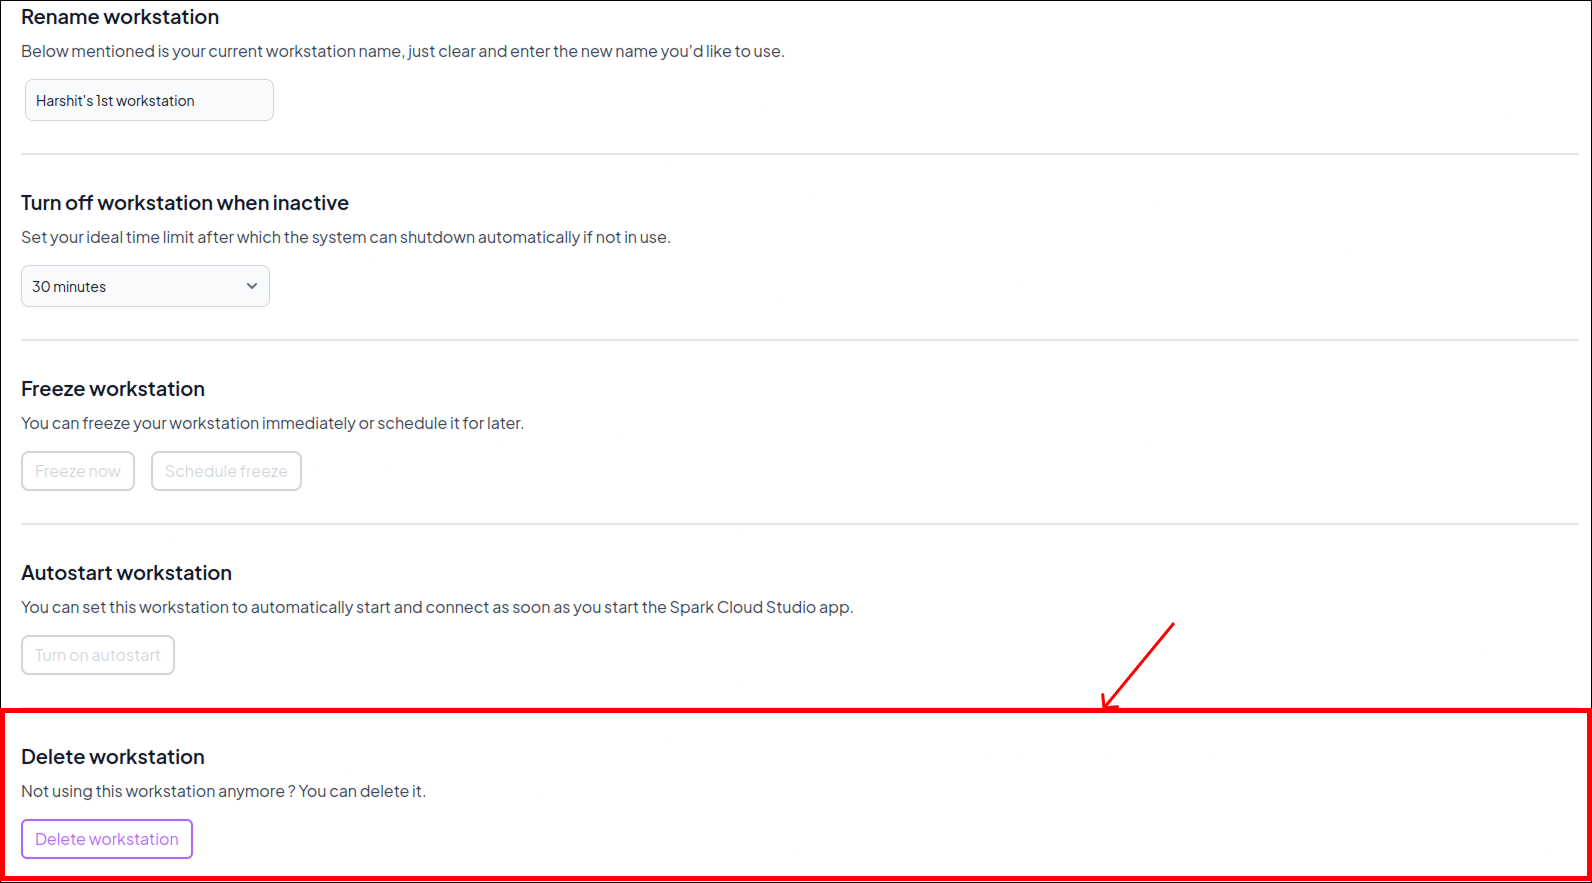 |
Detailed Settings Options
Below are the configurations and options you will see when you select the following tools from the settings menu:
When you click Change Configuration, a panel will open allowing you to optimize your workstation for peak performance at any time. It will display your current hardware configuration along with a recommended upgrade tier.
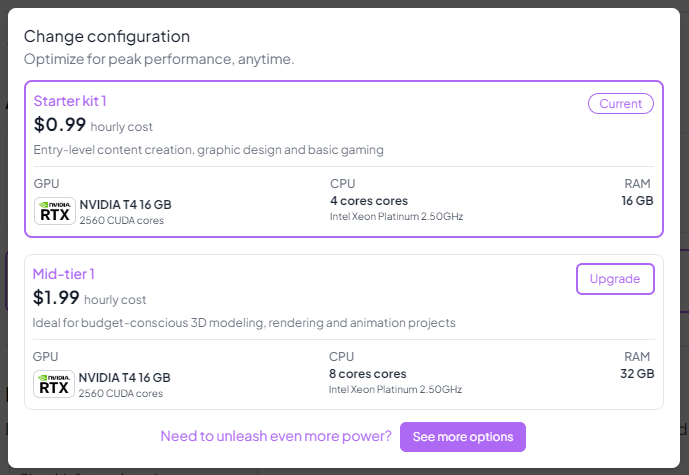
The configuration modal outlines everything you need to know about each hardware tier before making a decision:
- Pricing Details: Displays the transparent hourly cost for each tier.
- Use Cases: Provides guidance on what workloads each configuration is best suited for, such as basic content creation or heavy 3D rendering.
- Hardware Specs: Clearly lists the allocated GPU model/VRAM, CPU core count/processor architecture, and system RAM.
If you need to view the full catalog of available hardware options, click the See more options button at the bottom of the modal.
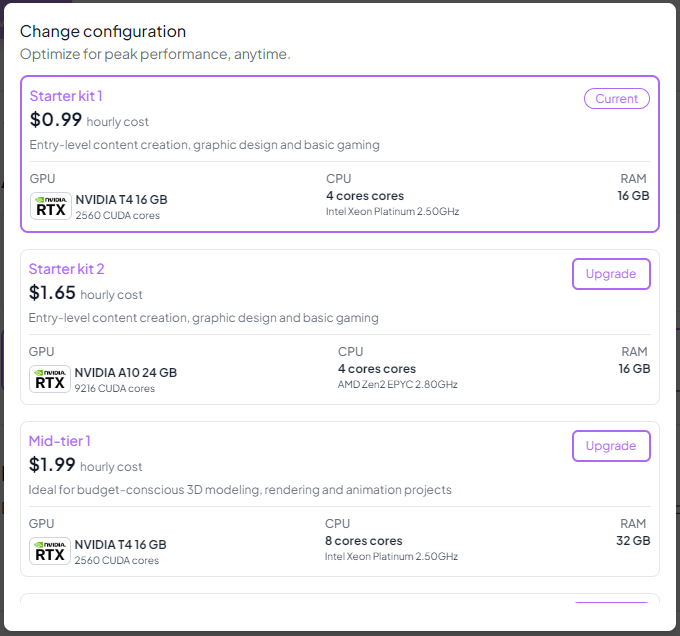
From the expanded list, you can scroll through all available workstation specs and freely choose to Upgrade or Downgrade your machine to any tier. The status badge will always indicate your Current hardware configuration.
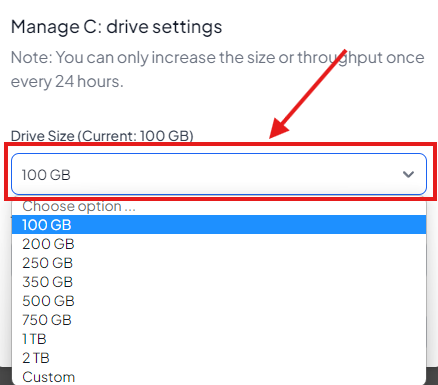
Clicking Expand Root Drive will open a settings modal allowing you to increase the capacity and speed of your primary OS disk without losing any data.
You can adjust two primary settings for your Root Drive:
- Drive Size: Select a new storage capacity from the preset list (ranging from 100 GB up to 2 TB) or enter a custom size to meet your exact specifications.
- Throughput (Speed): Choose a desired disk read/write speed from the available dropdown options (ranging from 125 MBps to 2000 MBps) to improve disk performance.
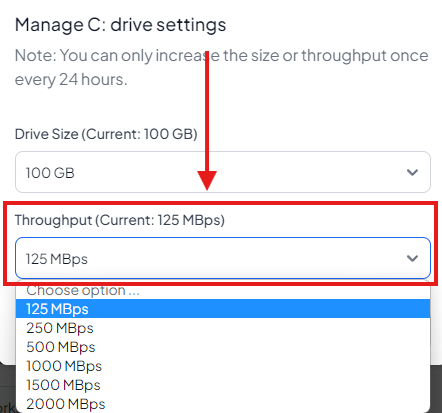
Important Limitations:
- To prevent system instability, root drive modifications can only be applied once every 24 hours.
The View Usage History option opens a detailed modal displaying a comprehensive log of your workstation's past sessions and accumulated costs.
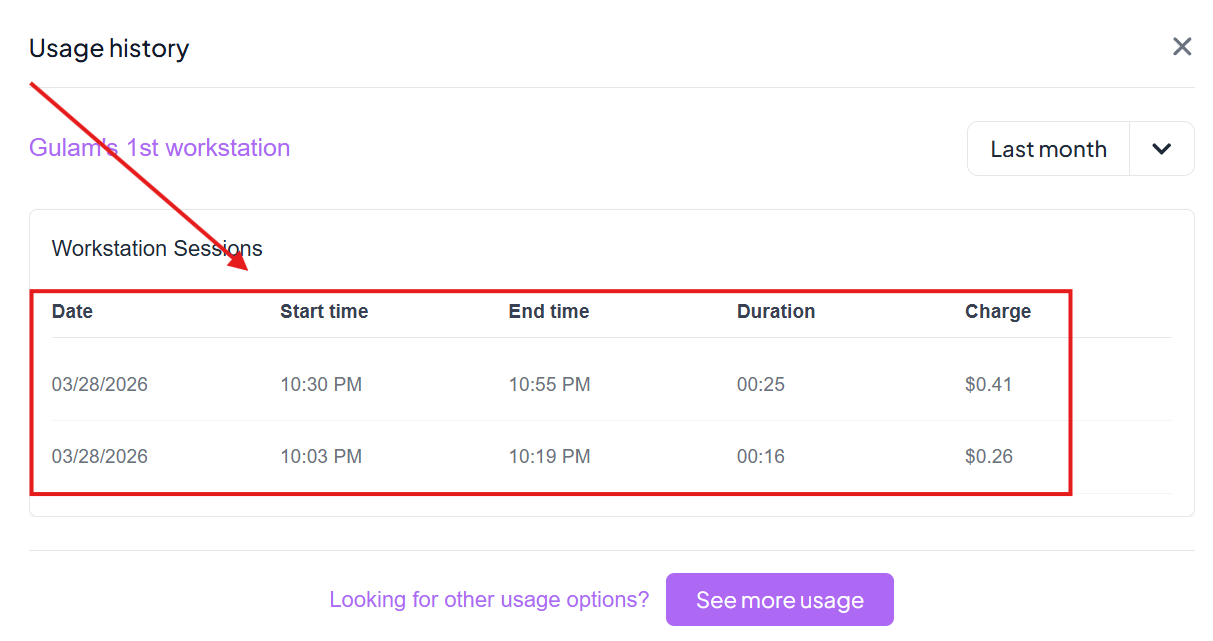
By default, it shows your activity for the Current month, but you can use the dropdown menu to filter past usage. The session table provides a granular breakdown of each launch:
- Date: The specific day the session was initiated.
- Start time & End time: Exact timestamps to help you audit your activity.
- Duration: Total time the workstation was actively running during that session.
- Charge: The exact monetary cost incurred for the specific duration of that session.
If you need to explore deeper usage analytics or configure billing features, click the See more usage button at the bottom of the modal.
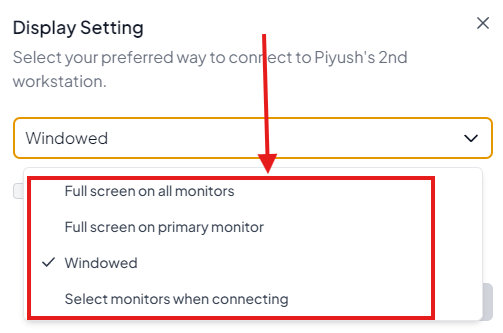
Selecting Display Preferences opens a modal where you can configure how your remote desktop session appears when connecting via TGX. You can tailor the display behavior specifically to match your multi-monitor or single-monitor setup.
Click the dropdown to select one of the following four display modes for your connection:
- Full screen on all monitors: The TGX remote session will span across all available local monitors seamlessly, maximizing your visual workspace.
- Full screen on primary monitor: The remote session will enter full-screen mode but restrict itself strictly to your primary local monitor, leaving your other screens free for local applications.
- Windowed: The remote session will open within a standard, resizable window on your local machine. This is ideal if you need to frequently switch back and forth between local tools and the remote workstation without minimizing the session.
- Select monitors when connecting: You will be prompted to manually choose exactly which displays to utilize each time you initiate a new connection.
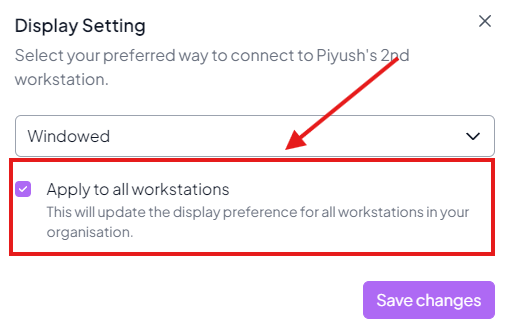
Apply Organization-Wide: By checking the Apply to all workstations box before clicking Save changes, your chosen display preference will be automatically synchronized across all workstations assigned to you, saving you the hassle of configuring each machine individually.
Clicking Duplicate workstation allows you to instantly spin up an exact hardware replica of your current machine. This is particularly useful if you need an additional node for your workloads or want to provide a team member with an identical setup.
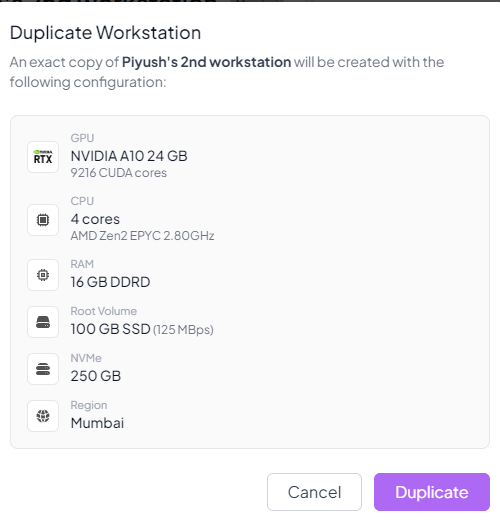
Before creating the clone, a confirmation modal will outline the precise hardware specifications that will be provisioned for the new workstation:
- Core Specs: Verifies the GPU, CPU architecture and core count, and RAM allocation.
- Storage: Displays the Root Volume details (size, throughput) and NVMe capacity.
- Region: Confirms the geographical data center where the new machine will be hosted (e.g., Mumbai).
Click Duplicate to lock in these settings and begin the remote provisioning process.
Note
At Startupindicates that the feature is already available after arrival to the dashboard.Runningindicates that the feature is available only after launching the workstation.At Stopindicates that the feature appears only when the workstation is currently stopped.At Freezeindicates that the feature appears only when the workstation is currently frozen.Coming Soonindicates that the feature is currently under development and will be available in future updates.- For feedback or early access to beta features, contact:
ignite@sparkcloud.studio